
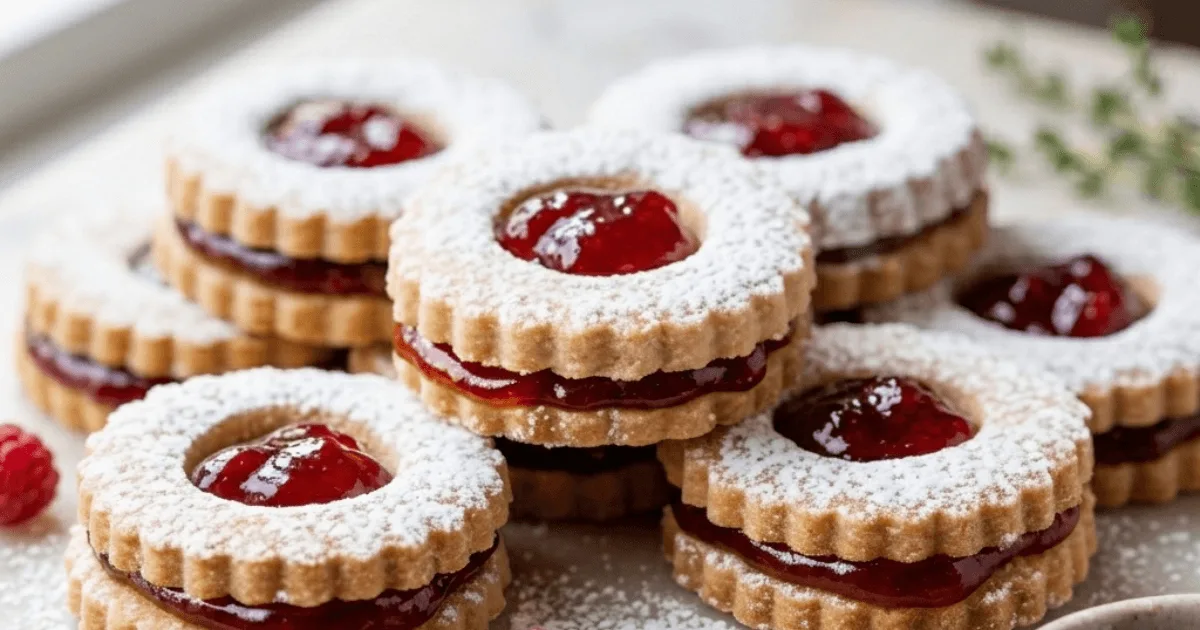
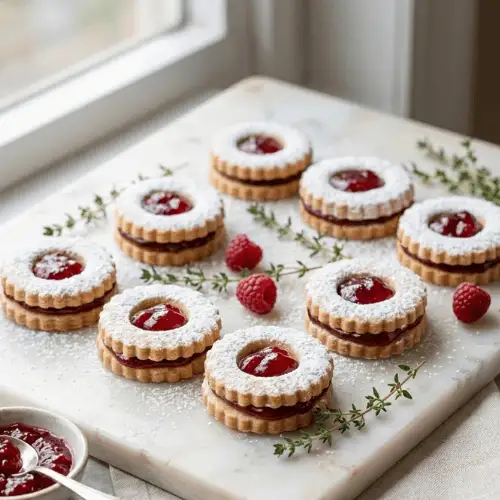
You know those cookies that look absolutely gorgeous on Pinterest but turn into a complete disaster when you try making them? Yeah, Linzer biscuits are exactly that cookie. I’m talking about the fancy sandwich ones with jam peeking through a little window, all dusted with powdered sugar like fresh snow.
They’re also the cookies that humbled me hard during my first few tries. But after way too many batches, I’ve figured out where things go wrong. Let me save you the headache.
Table of Contents
What Even Is a Linzer Biscuit?
Picture Austria as it was 400 years ago. A baker in Linz created this famous torte that became a big deal. Fast forward to now, and someone brilliant shrunk it into cookie form.
These little guys are basically buttery shortbread-style cookies, the melt-in-your-mouth kind, with ground almonds or hazelnuts mixed in. This is KEY. You sandwich two cookies together with jam, cut a cute little window in the top cookie, and dust it with powdered sugar.
They LOOK fancy. They TASTE fancy. But honestly? They’re not rocket science—once you know a few rules.
Why These Cookies Test Your Patience
These aren’t the type of cookies where you mix all ingredients in one bowl and finish. They need a tiny bit more attention than your average chocolate chip situation.
The nuts make the dough delicate. The butter makes it temperature-sensitive. The whole sandwich thing adds an extra step where stuff can go wrong.
But here’s the thing—once you know WHY stuff fails, avoiding failure gets way easier. Think of me as your baking bestie who already made all the mistakes so you don’t have to.
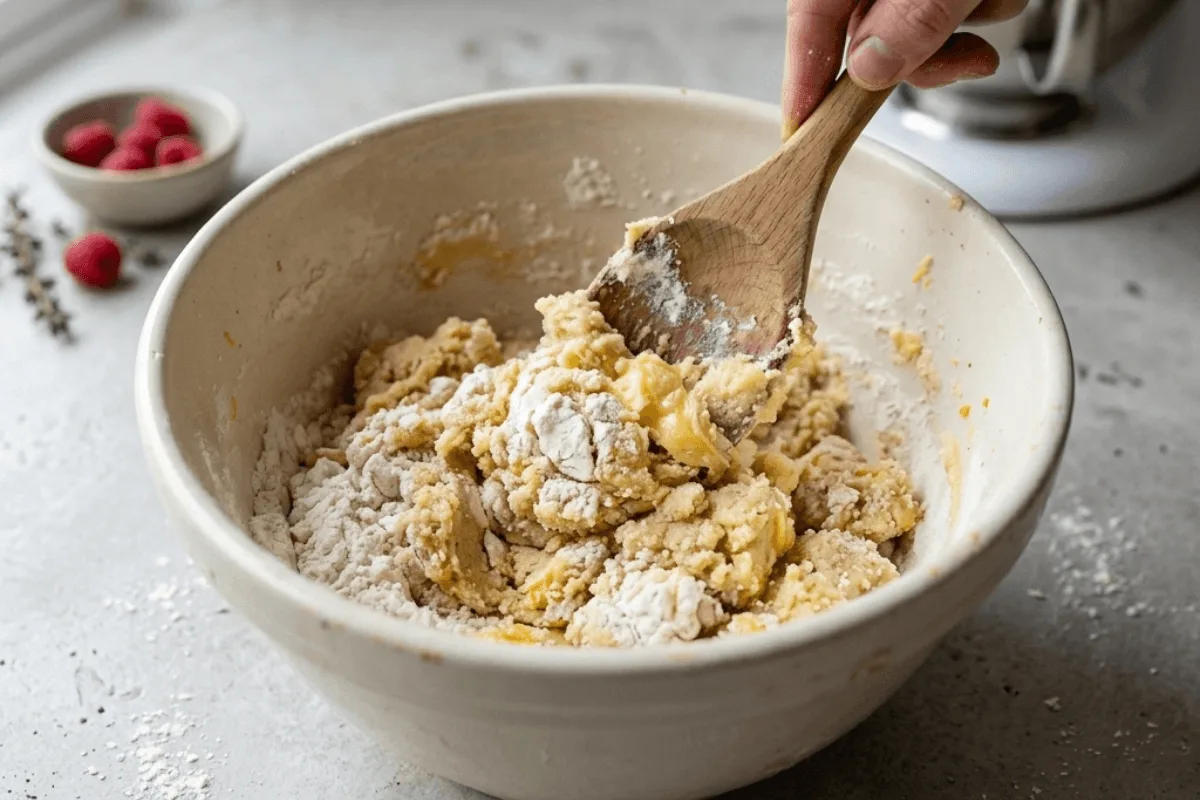
Linzer Biscuit Dough Drama
The Chilling Situation
This is THE mistake. The big one. The reason why it looks like sad blobs.
Here’s what happens: butter gets soft at room temp great for mixing. But once flour joins the party, that butter needs to firm up again. Chilling solidifies it, so when cookies hit the oven, the butter melts slowly instead of immediately turning into a puddle.
The fix: Give your dough at least 1-3 hours in the fridge. Overnight works great. If a recipe says “chill for 30 minutes,” it’s lying. Don’t fall for it.
The Measuring Mess
Almond flour is amazing for flavor, but ANNOYING for measuring. It packs differently depending on how you scoop, and suddenly you’ve added way too much,h and your cookies are dry and sad.
The fix: Get a kitchen scale. I know it feels extra, but it genuinely makes a difference. Weigh measurements don’t play games.
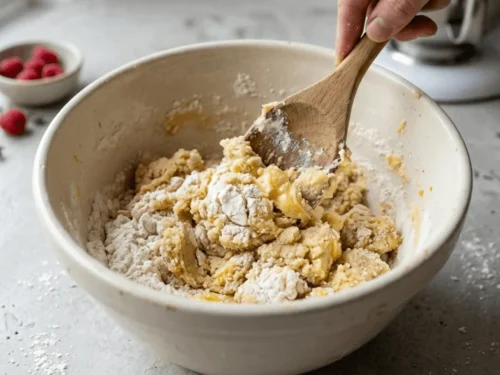
Stop Manhandling Your Dough
That beautiful, tender texture? It comes from handling the dough as little as possible. Every time you mix or reroll, you’re developing gluten. Too much gluten = tough cookies.
The fix: Mix until everything JUST comes together. You should still see little butter bits throughout. That’s actually good.
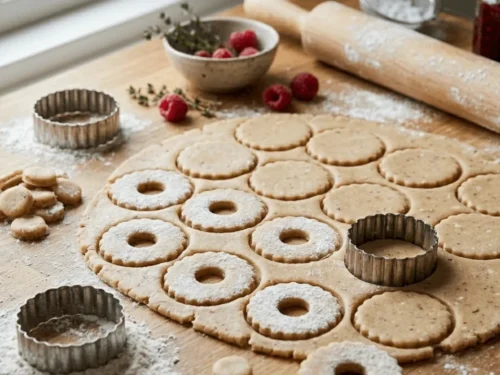
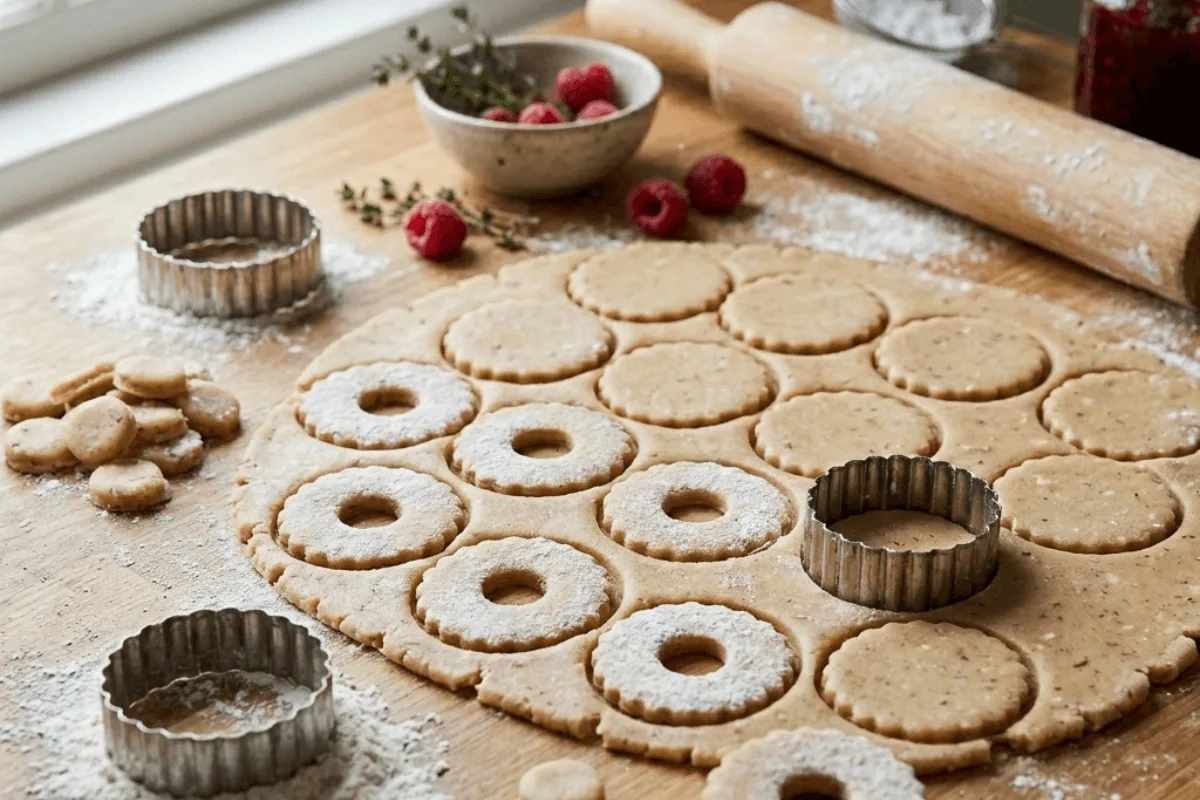
Rolling and Cutting
The Thickness Struggle
If your dough isn’t rolled evenly, some cookies will burn while others stay underdone. Plus, tops and bottoms need to match so the sandwich sits flat.
Target thickness: Aim for 1/8-inch (like 3mm) for classic crisp cookies. Go for 1/4-inch (6mm) if you want them softer. Just pick one and be consistent.
The parchment paper trick that changed my life: Roll between two sheets of parchment. No sticking. No extra flour is drying everything out. Plus, you can slide the whole thing onto a baking sheet and chill it without moving anything. Game changer.
Don’t Confuse Your Cutouts
This sounds basic, but in baking chaos, it’s easy to forget: you need the SAME NUMBER of solid bottoms and cutout tops.
The fix: Cut ALL your large shapes first. Then cut centers from exactly half of them. Move those center-cut ones to a separate area so you don’t mix them up later.
Baking Without Disaster
The Separate Tray Thing
This tip alone improved my Linzer game by like a million percent. Bake tops and bottoms on SEPARATE sheets.
Those top cookies with holes have less dough. They bake faster. On the same sheet as solids, you either pull bottoms too early or burn tops.
The fix: Two baking sheets. Solids on one, cutouts on another. Check tops first—they’ll probably be done 2-3 minutes earlier.
What “Done” Actually Looks Like
Forget golden brown. These cookies should NOT get deeply golden.
When to pull them: Edges should JUST barely show color. Like a whisper of gold. Not actual tan. Centers should look dry instead of shiny. They’ll feel slightly soft but firm up as they cool.
Let them rest: Leave them on the baking sheet for 5 minutes before moving. Move too soon, and they’ll break. Patience, friend.
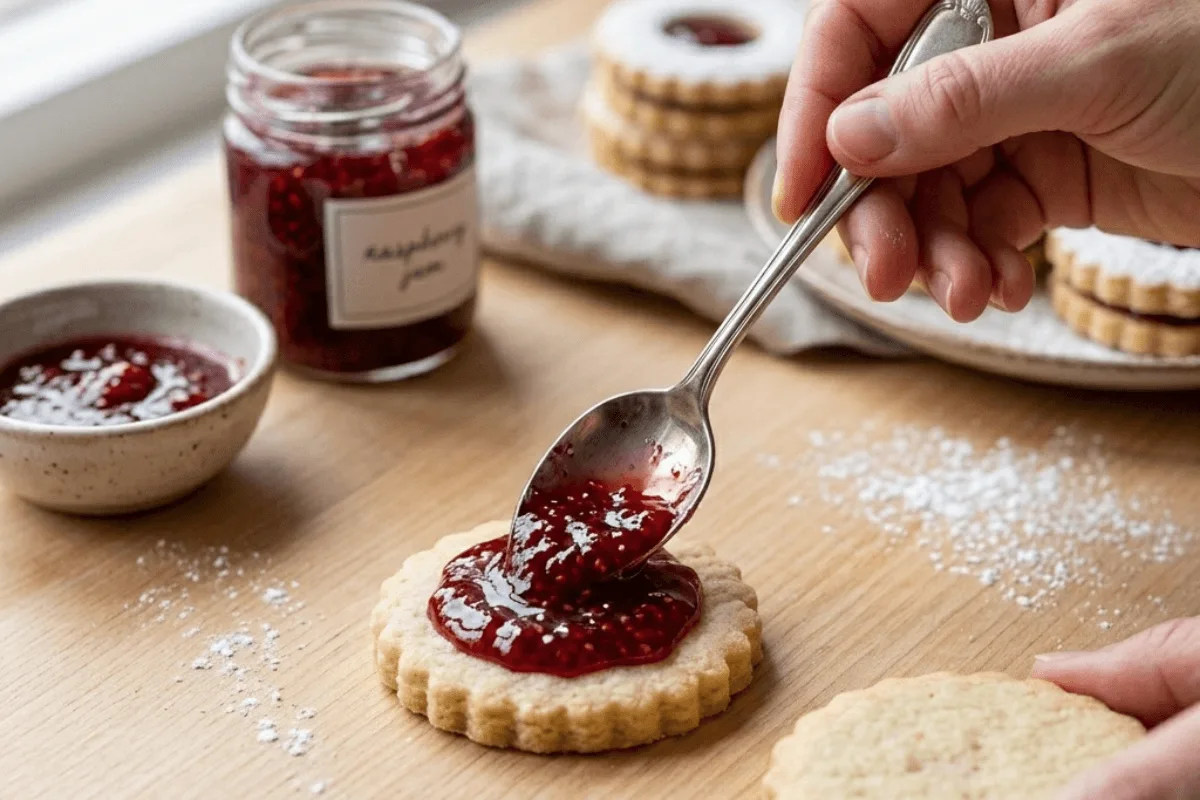
Filling and Assembly
Your Jam Choices Matter
Runny jam = soggy cookies within hours. Chunky jam with fruit pieces = the top cookie won’t sit flat.
The fix: Buy good seedless preserves. Raspberry is classic and amazing. Apricot and strawberry work great too.
If your jam seems loose: Simmer it in a small saucepan for 8-12 minutes until it thickens. Cool completely before using. This concentrated jam stays PUT.
The Powdered Sugar Timing Trap
Here’s where everyone messes up: they assemble cookies FIRST, then dust with sugar. Then they wonder why their beautiful jam windows are covered in white powder.
The fix: Dust cutout tops individually BEFORE assembly. Put them on a wire rack over a sheet pan, sugar them up, THEN place onto the jammy bottoms.
Don’t Get Greedy With Jam
More jam is NOT better. Too much squeezes out the sides when you press the top down, and suddenly you’ve got a sticky disaster.
The fix: Use like 1/2 to 1 teaspoon per cookie. Spread it a little, leave a tiny border around the edge. Press gently until jam just reaches edges—not until it’s oozing everywhere.
Stuff I Wish Someone Had Told Me
Toast your nuts. Spread almond flour on a baking sheet and toast at 350°F for 5-7 minutes until it smells amazing. Cool it. This one step makes the flavor SO much better.
Day two is better. I know you’ll want to eat them immediately. But they improve overnight. The jam softens cookies slightly, and everything melds together. Store in an airtight container and thank me later.
Chill whenever frustrated. Dough getting sticky? Fridge. Cookies spreading? Fridge break. Having a moment? Use the fridge. It helps.
Freeze for later. Unfilled baked cookies freeze great for like three months. Fill and dust after thawing for fresh Biscuits whenever.

Quick Fixes for Common Disasters
| Problem | What Happened | Fix It |
|---|---|---|
| Dough cracks when rolling | Too cold or dry | Let sit 5-10 mins; smoosh cracks back, or chill less next time |
| Cookies spread everywhere | Dough too warm going in | Chill cut cookies 15 mins before baking |
| Biscuits are tough | Overmixed or too much flour | Mix less; use a scale |
| Tops keep breaking | Hole too big or cookies too thin | Smaller cutter; roll slightly thicker |
| Jam makes everything soggy | Jam too thin or cookies overbaked | Thicken the jam; bake less |
| Uneven baking | Different thicknesses | Roll evenly; bake tops and bottoms separately |
Classic Linzer Biscuits Recipe Card
Classic Linzer Biscuits
Equipment
- Large bowl
- Rolling Pin
- 2-inch round cutter 5-6 cm
- Small cutter
- baking sheets
- Wire Rack
- Small saucepan
- Fine sieve
Ingredients
For Dough:
- ¾ cup softened unsalted butter 170g
- ½ cup sugar 100g
- 1 large egg
- ½ tsp lemon zest
- ¼ tsp vanilla extract
- 1 ½ cups finely ground hazelnuts 150g
- 2 ¼ cups cake or flour 280g
- ½ tsp baking powder
- ½ tsp cinnamon
For Filling & Decoration:
- 6 oz raspberry jam 3/4 cup
- Powdered sugar for dusting
Instructions
- Cream butter and sugar till fluffy. Beat in egg, zest, vanilla, then nuts.
- Whisk dry ingredients (flour, baking powder, cinnamon); mix into wet ingredients till dough forms.
- Split dough into disks, wrap, chill 1-3 hours.
- Preheat to 350°F (175°C).
- Roll dough to 1/8-inch (3mm). Cut rounds; add windows to half. Re-roll scraps gently.
- Bake on parchment sheets 12 mins till edges are barely golden. Cool on the sheet, then rack.
- Warm jam till runny. Spread 1/2 tsp on solid cookies; top with window ones. Pipe extra jam if you want.

- Dust with powdered sugar. Let's set—done! Tastes better the next day.
Notes
- Toast nuts first for an epic flavor boost.
- Dough too soft? Fridge it 15-20 mins (pre-bake too).
- Use thick, seedless jam—simmer if runny to dodge sogginess.
- Store airtight or in a tin up to 14 days; gets tenderly perfect.
NUTRITION (Per serving, estimated):
- Calories: 502
- Total Fat: 27g
- Saturated Fat: 12g
- Carbs: 61g
- Fiber: 2g
- Sugar: 25g
- Protein: 6g
FAQ
What’s the most common Linzer biscuit mistake?
Not chilling enough. Causes basically every problem—sticky dough, spread cookies, lost shapes.
Why do I have to chill this dough so much?
Because butter. Chilling solidifies it so your cookies keep their shape instead of turning into puddles.
How do I stop them from spreading?
Keep everything cold. Chill after mixing. Chill after rolling. Chill after cutting if your kitchen is warm. Cold dough is happy dough.
What jam should I actually use?
Seedless raspberry is traditional and amazing. Apricot and strawberry work great too. Just make sure it’s thick.
How do I know when they’re done?
Edges are just barely golden. Centers look dry. They should NOT be brown.
Why are my Biscuits dry and crumbly?
Too much flour (especially almond flour), or you overbaked them. Scale helps with the first one; watching carefully helps with the second.
Mastering the Linzer Biscuit
Look, Linzer biscuits take a little more effort than regular cookies. But honestly? That’s what makes them special. When you nail them—when that dough rolls out perfectly, when those windows are clean, when you bite through that buttery, nutty cookie into bright jam—it’s SO worth it.
Your first batch might not be perfect. Mine definitely wasn’t. But a few batches from now, you’ll be handling that dough like a pro.
Start with the basics. Chill your dough. Measure carefully. Watch for those barely-golden edges. And enjoy the process.