
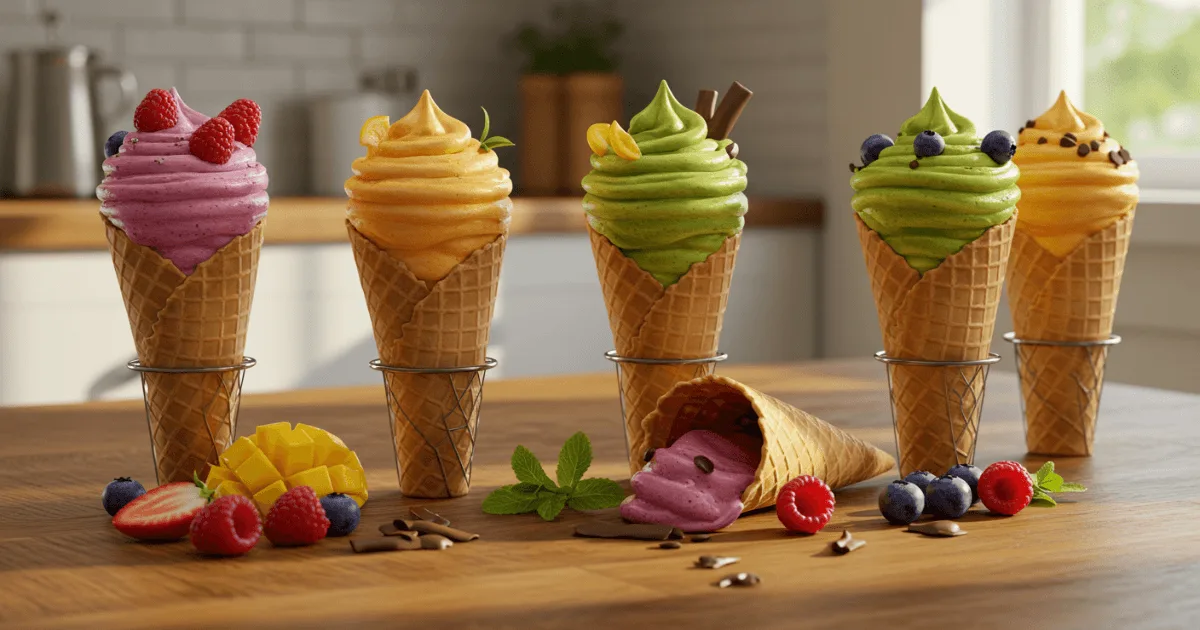
You remember the feeling, don’t you? The sun blazing overhead, a sweet chill trickling down your fingertips, and the burst of flavor that only a good old-fashioned ice cream cone can bring. It’s not just dessert—it’s pure happiness. This guide is your key to getting that nostalgia home with eight joyful ice cream cone recipes. Whether you’re seeking a classic treat or a smoothie twist inspired by the Hailey Bieber smoothie recipe trend, you’ll find something here to excite your tastebuds and brighten your day.
Table of Contents
The Magic of Ice Cream Cone Recipes
There’s a reason why ice cream cones have remained popular over time. From carnivals to Cold Stone Creamery counters, they’ve been a vessel of joy. But beyond the nostalgia, these crispy, golden delights serve as perfect edible carriers for all things creamy, fruity, and indulgent.
Why cones? They add crunch, keep your hands clean, and turn any scoop into handheld heaven.
Homemade advantage: Control ingredients, customize flavors, and ditch preservatives.
Ready to get started? You’re about to learn how to recreate that magic, your way.
Necessary Supplies and Components for Making an Ice Cream Cone at Home
Tools You’ll Need
- Waffle cone maker or a non-stick skillet
- Silicone spatula
- Mixing bowls
- Measuring cups and spoons
- A cone mold or a thick paper rolled into a cone shape
Basic Cone Batter Recipe
| Ingredient | Quantity | Note |
|---|---|---|
| All-purpose flour | 1 cup | Substitute with GF if needed |
| Sugar | 1/2 cup | Granulated |
| Eggs | 2 | Room temperature |
| Butter | 1/4 cup | Melted |
| Vanilla extract | 1 tsp | Optional for aroma |
Advice: Letting the batter rest for 10–15 minutes can result in a smoother texture.
8 Joyful Ice Cream Cone Recipes You Need to Try
1. Classic Waffle Cone + Vanilla Bean Scoop
The ageless indulgence that never loses its charm
Imagine that perfect carnival smell wafting through your kitchen.
For the cones:
- 1 cup all-purpose flour
- 2 eggs
- 1/2 cup sugar
- 1/4 cup melted butter
- 1 teaspoon vanilla extract
- 2 tablespoons milk
- A pinch of salt
Let’s make magic:
- Beat the eggs with the sugar until the mixture is fluffy and full of bubbles.
- Stir in the butter, vanilla, milk, and salt.
- Gently fold in the flour.
- Heat your waffle iron or skillet to medium heat.
- Drop about 2 tablespoons of batter, spread thin, and cook until golden, about 1–2 minutes.
- Quickly roll into a cone shape (use a mold or shape with clean hands).
- Let cool, then fill with vanilla bean ice cream and top with rainbow sprinkles.
Pro tip: Keep cooked cones under a slightly damp towel while working—they’ll stay flexible enough to shape without cracking.
2. Chocolate-Dipped Cone with Peanut Butter Ripple
For when you want to feel like a kid again
You’ll need:
- 4 ready-made cones (or your homemade cones)
- 1/2 cup dark chocolate chips
- 1 teaspoon coconut oil
- 2 cups peanut butter ripple ice cream (or vanilla with peanut butter swirled in)
- 2 tablespoons crushed peanuts
Let’s create happiness:
- Melt chocolate and coconut oil together (microwave in 30-second bursts or use a double boiler).
- Dip cone rims in chocolate.
- Let harden on parchment paper (about 5 minutes).
- Scoop in ice cream, layer with extra peanut butter, and top with peanuts.
Secret trick: Drizzle some chocolate inside the cone before filling—it creates a protective barrier against drips and adds chocolatey goodness!
3. Rainbow Sprinkle Cone for Kids
Because eating colors is acceptable now
Gather:
- Waffle cone batter from recipe #1
- Food coloring (red, blue, yellow)
- 1 cup each of orange, raspberry, and lime sherbet
Let’s play:
- Divide the batter into three bowls.
- Color each bowl differently.
- Cook each color separately into thin rounds.
- Roll into cones while still warm.
- Layer small scoops of each sherbet color.
Parent hack: Freeze the cones for 10 minutes before filling—this helps prevent melting.
4. Coconut Cone with Mango Smoothie Ice Cream
Your taste buds’ tropical vacation
You’ll want:
- Standard cone mixture with the addition of 1/4 cup of toasted shredded coconut
- 2 cups frozen mango
- 1/2 cup coconut milk
- 1 tablespoon honey (or more to taste)
Escape to paradise:
- Mix toasted coconut into the cone batter.
- Cook as usual.
- Blend mango, coconut milk, and honey until smooth.
- Freeze for 30 minutes if too soft.
- Fill cones and top with extra toasted coconut.
Chef’s tip: A sprinkle of lime zest on top enhances the flavors.
5. Vegan Almond Cone with Berry Nice Cream
So good they won’t believe it’s vegan
Gather:
- 1 cup almond flour
- 1 flax egg (1 tablespoon ground flax + 3 tablespoons water, let sit 5 minutes)
- 2 tablespoons maple syrup
- 2 frozen bananas
- 1 cup mixed berries
Let’s make magic:
- Mix almond flour, flax egg, and maple syrup (the mixture will be sticky).
- Shape into cones.
- Bake at 350°F for about 10 minutes, until fragrant.
- Blend bananas and berries until creamy.
- Fill immediately and enjoy.
Bonus: Stir in 1 tablespoon cocoa powder into the cone mix for a chocolatey twist.
6. Gluten-Free Cone + Strawberry Cheesecake Swirl
Because everyone deserves amazing cones
You’ll need:
- 1 cup gluten-free flour blend
- 1/2 teaspoon xanthan gum
- Classic cone ingredients (substitute gluten-free flour)
- 1 cup strawberry puree
- 4 ounces cream cheese (softened)
- 1/2 cup powdered sugar
Let’s bake happiness:
- Make a cone batter with gluten-free flour and xanthan gum.
- Cook into cones—handle with care, as they may be more delicate.
- Beat cream cheese and powdered sugar until smooth.
- Swirl into softened vanilla ice cream with strawberry puree.
- Fill cones and top with crushed gluten-free graham crackers.
Insider tip: Soften cream cheese by microwaving it for 10 seconds to ease the mixing process.
7. Coffee-Infused Cone with Mocha Cream
The grown-up cone of your dreams
Gather:
- Classic cone batter plus 1 tablespoon instant espresso
- 2 cups of coffee-flavored ice cream (or vanilla ice cream mixed with espresso powder)
- 2 tablespoons cocoa powder
Let’s caffeinate:
- Stir espresso powder into the cone batter.
- Cook as usual.
- Mix cocoa powder into softened coffee ice cream.
- Refreeze for 15 minutes if needed.
- Fill coffee cones and dust with extra espresso powder.
Adulting upgrade: Add a splash of Kahlúa to the ice cream mix for extra flavor.
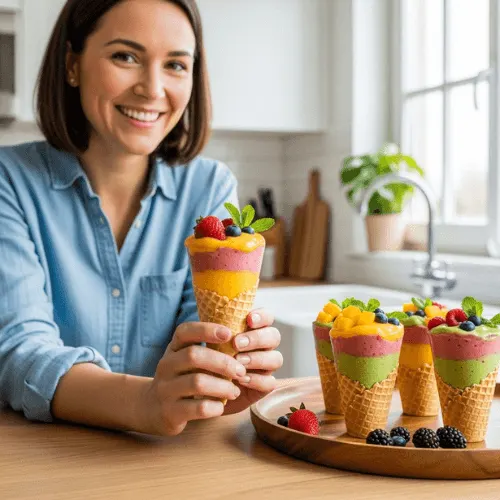
8. Ice Cream Cone Smoothie Stack
The Instagram-worthy showstopper
You’ll need:
Green layer:
- 1 frozen banana
- 1/2 cup spinach
- 1/4 cup almond milk
Pink layer:
- 1/2 cup frozen strawberries
- 1 teaspoon chia seeds
White layer:
- 1/2 cup frozen pineapple
- 1/4 cup coconut yogurt
Let’s build art:
- Blend each layer separately, keeping them thick.
- Start with green in the cone, then pink, then white.
- Drizzle with honey and eat immediately—this is a race against melting!
Presentation tip: Use a piping bag for neat layers, or spoon in for rustic charm.
Final thoughts from my kitchen to yours:
- Store extra unfilled cones in an airtight container—they’ll stay crisp for days.
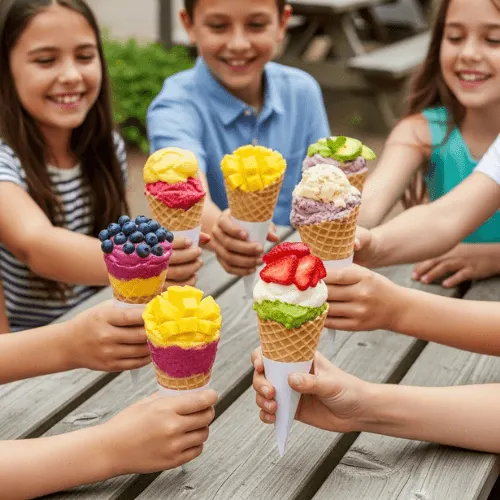
- Let kids customize their own: sprinkles, dips, toppings—creativity tastes delicious.
- Never forget, creating an ice cream cone involves no errors—just pleasant surprises and inventive recipe inspirations!
Now go forth and create cone magic! Which one will you try first?
Tips for Perfect Homemade Cones
- Don’t overmix the batter; keep it airy.
- Roll cones while they’re hot and pliable.
- Cool upside down to maintain shape.
- Store in airtight containers to keep crisp.
Toppings & Variations to Explore
Add-ins for Cone Batter
- Cocoa powder for chocolate cones
- Cinnamon for warmth
- Matcha powder for a green twist
Smoothie-Based Fillings
- Avocado-lime for creaminess
- Blueberry-acai for antioxidants
- Peach-ginger for a spicy zing
Think beyond traditional scoops—use your cone as a fun way to enjoy smoothies on the go.
Conclusion: Every Cone Is a Joyful Bite
There you have it—eight unforgettable ways to enjoy ice cream cone joy at home. Whether you’re recreating your favorite Cold Stone Creamery combo or inventing your own shaved ice fantasy, these recipes turn dessert into a delightful experience. Get creative, get messy, and most of all, have fun.
Ready to scoop, stack, and swirl? Tag your creations and share the joy with someone you love!
Frequently Asked Questions (FAQ)
What exactly goes into an ice cream cone?
Flour, eggs, sugar, and butter come together like old friends at a summer picnic. For added flavor, waffle cones commonly contain a touch of vanilla or cinnamon.
How did this brilliant invention come to be?
At the 1904 St. Louis World’s Fair, a vendor ran out of dishes to serve ice cream. Nearby waffles were rolled into cones, and the handheld dessert legend was born.
What does the ice cream cone truly symbolize? On the surface, it’s a crispy, edible vehicle for your favorite scoop. Dig deeper, and it’s nostalgia, summer memories, and the joy of catching drips before they escape.
Who invented the cone?
Credit usually goes to Ernest A. Hamwi at the 1904 Fair, but several vendors claimed the idea. It was a situation where timing and location aligned perfectly.
Which country gets bragging rights for ice cream itself?
Ancient China made early icy desserts, but Italy and France perfected the creamy version we love today.
Are cones an American thing?
They became popular in the U.S., but the inspiration came from Europe’s rolled pastries.
Why call it an “accidental” invention?
Because the best ideas often come from “Oh no… wait, that might work!” moments. No dishes? No problem—just roll, scoop, and enjoy.
These cone ideas are next-level! My kids are obsessed with ice cream, and now they want to try them all. Which one do you think is the easiest to start with for a weekend treat?
That makes me so happy to hear! 🍦❤️ For a fun weekend treat, I’d suggest starting with the Chocolate-Dipped Berry Crunch Cone—it’s super easy, kid-approved, and looks impressive without a ton of prep. Just dip, fill, and top with their favorite fruits or sprinkles! Let me know how it goes—sounds like a delicious family activity!
Do you think I can make these with gluten-free cones? I’d love to try the berry cheesecake version!
Absolutely, you can definitely make these with gluten-free cones! There are some great store-bought options out there now, or you can even make your own if you’re feeling adventurous. The Berry Cheesecake Cone would be perfect with a gluten-free base—just be sure to check your cookie crumbles or crust topping for hidden gluten if you’re adding those. Can’t wait to hear how yours turns out!
jjfb5q
Absolutely! Gluten-free cones work great with any of these recipes. And the berry cheesecake cone is a creamy, fruity dream!
I’m obsessed with the unicorn cone idea. My daughter screamed with joy when she saw the picture!
Aww that makes us so happy! 🦄✨ The unicorn cone is all about joy and color—perfect for little ones (and grown-up kids at heart)!
The peanut butter banana cone is genius! Feels like dessert and a protein snack at the same time.
Exactly! It’s a sweet treat and energy boost all in one. Great for post-workout or a guilt-free indulgence!
Love the creativity here! I never thought of using fruit and yogurt in a cone—healthy and delicious!
Thanks so much! 🍓 It’s a great way to enjoy something refreshing without too much sugar. Guilt-free magic!
These ideas are perfect for a summer party! I’m thinking of setting up a DIY cone bar for my kids’ birthday.
That sounds like so much fun! 🎉 A DIY cone bar is a total hit—kids love customizing their own magical cones!
I had no idea you could do so many creative things with an ice cream cone! The breakfast cone totally surprised me.
Right? 😄 Who says cones are just for dessert? The breakfast cone is perfect for a fun twist on morning treats!
This post is a dream! 🍦 The s’mores cone sounds absolutely magical. Can’t wait to try it this weekend!
Yay! The s’mores cone is always a crowd-pleaser—melty chocolate and gooey marshmallow, what’s not to love? Let us know how it turns out!
These ice cream cone recipes look absolutely magical! 🍦✨ I can’t wait to try them out—especially the creative twists. Thanks for sharing such fun and delicious ideas!
I’m thrilled you liked them! Have fun trying the recipes—let me know your favorite twist!
I’d love to see more recipes like this—especially ones that help with stress or focus.
You got it! I’ll be working on a few blends specifically for stress relief and mental clarity. Stay tuned—your wellness journey is just getting better!
Absolutely! I’ve started paying more attention to how food affects my mood too. These smoothie ideas are right on time.
That’s amazing to hear! 🌟 It’s incredible how nourishing ingredients can lift our mood and energy. Keep listening to your body—it knows what it needs. Let me know if you’d like more feel-good recipes soon!
These ice cream cone ideas are so fun and creative! I can’t wait to try a few of them with my kids this weekend. Thanks for sharing such delicious inspiration!
I’m so glad you enjoyed the recipes! Let me know which one you try first — they’re all so much fun to make!
I love how these smoothies are not just about detox, but also about emotional wellness. Such a refreshing approach!
Thank you! That means a lot. We truly believe wellness is both physical and emotional—so happy it resonated with you!
These ice cream cone recipes look so fun and creative—perfect for a treat night!
They look cool, though some of them seem a bit messy to make at home.
This is such a fun idea! I’m always looking for creative ways to use up ice cream cones. The ‘S’mores Cone’ looks incredible!
It’s one of my favorites! It’s amazing how a simple cone can be transformed into so many different treats. Hope you enjoy making them!
This is amazing! Who knew you could get so creative with ice cream cones? Definitely trying a few of these for my next family dessert night!
Yay, love to hear that! Ice cream cones are the perfect canvas for fun desserts—let me know which one turns into your family’s favorite!
Can I make these without an ice cream maker?
Absolutely! Try the no-churn method in Recipe 7—it uses whipped cream and condensed milk for a creamy result without special equipment.
Which recipe is the easiest for kids to help with?
Recipe 5 is great for kids! It uses pre-made cones and fun toppings they can add themselves.
Which recipe is the easiest for beginners?
Recipe 3 is the simplest. It only needs 4 ingredients and no special tools. Perfect for trying first!
Wow, these recipes are amazing! I tried one with my kids and we had so much fun. Thanks for sharing!
I’m so glad you and your kids enjoyed it! Making ice cream cones together is such a fun activity, and the best part is eating your creations. Enjoy trying the rest of the recipes too!
Do these recipes work with store-bought ice cream, or do I need to make it from scratch?
Great question! You can definitely use store-bought ice cream — it works perfectly for all the recipes. Making it from scratch is optional if you want an extra special touch, but the cones turn out amazing either way!
Can I use dairy-free ice cream in these recipes?
Absolutely! Dairy-free ice cream works perfectly in all eight recipes. You can substitute it 1:1 and still get great flavor and texture. It’s a fun way to make the cones suitable for any diet!
Wow! These recipes look amazing. I tried one of the cones today and it was so fun to make and delicious. Thank you!
That’s wonderful to hear! I’m so glad you enjoyed it. Can’t wait for you to try the other recipes — each one has its own special twist!
These recipes look fun, but I’m not sure if I can make them all perfectly.
Thanks for checking them out! 😊 Don’t worry — they’re designed to be simple and fun. Even if one isn’t perfect, it’ll still taste amazing! 🍦💛✨
These ‘Magic Creations’ look incredible! I always struggle with the bottom of the cone leaking when the ice cream starts to melt. Do any of your 8 recipes include a trick to prevent that sticky mess?
I’m so glad you asked! One of my favorite ‘magic’ tricks included in these recipes is dropping a small marshmallow or a chocolate chip into the bottom of the cone before adding the ice cream. It acts as a delicious plug that stops any leaks. It’s a total game-changer for summer treats!
I never thought about making my own custom cones! These look so much better than the plain ones from the store. Which one of the 8 creations would you recommend for a kid’s birthday party that isn’t too messy to make?
hank you! For a birthday party, I definitely recommend the Chocolate-Dipped Sprinkles cone. It’s a huge hit with kids, and because the chocolate hardens quickly, it actually helps keep the cone sturdy and holds the drips better. It’s the perfect mix of ‘magic’ and practical!