
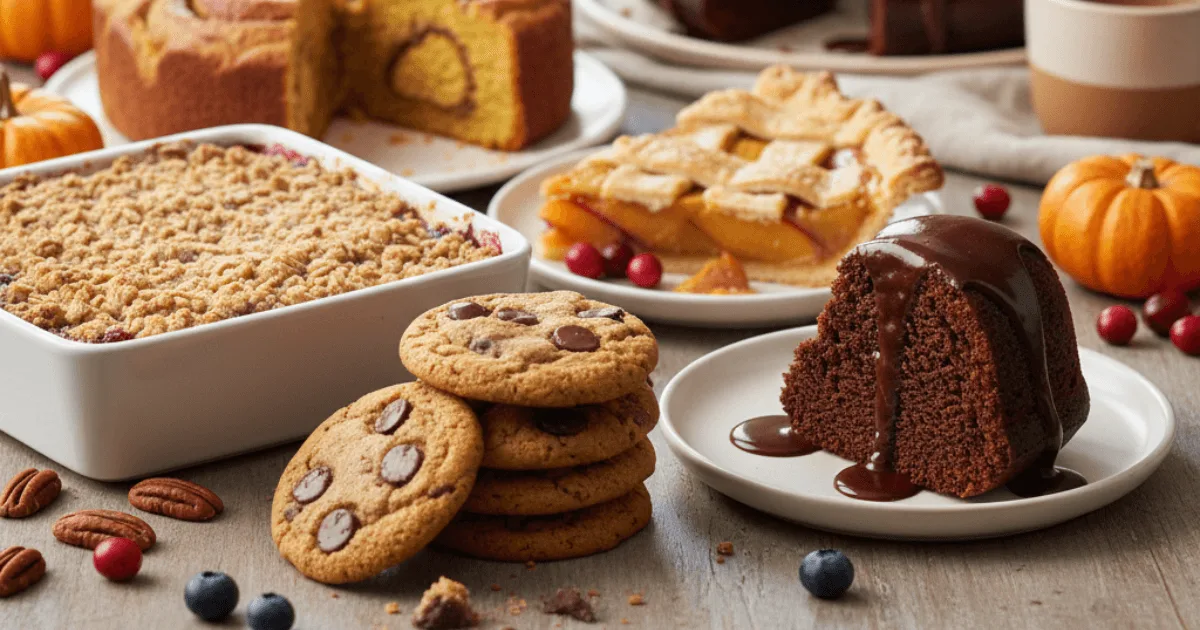
You know that perfect crisp in the air? Are the leaves displaying their vibrant colors? Yeah, it’s that magical time when all you want is something warm, cozy, and spiced to snuggle up with. Am I right? It’s the perfect season for exploring amazing Fall Desserts. Fall brings those amazing smells of cinnamon, nutmeg, and ginger, plus all the pumpkin and apple yumminess you can dream of!
Table of Contents
Honestly, we all love to brag a bit about our baking skills, especially if you’re heading to a potluck or hosting a holiday bash. But who’s got time to slave over a fancy pie for hours? Not me, and probably not you either.
Here’s the deal: you don’t have to be a high-level pastry chef to whip up show-stopping desserts. These fall dessert ideas look like you put in tons of effort, but nope—they’re super easy and foolproof. Guaranteed to get those “OMG, you made this?!” reactions, with no stress involved.
We’re skipping the brain-busting recipes and sticking with sweet treats that are actually fun to make.
Why These Easy Fall Desserts Are Basically Your New Besties
When I say “easy,” I mean lazy-easy. We’re talking about simple shortcuts—like using pre-prepared ingredients or quick recipes that can be knocked out in 30 minutes. So, you can kick back, relax, and still get major flavor points without any drama.
Don’t skimp on ingredients. Since these recipes keep it simple, use good-quality stuff. Like, a fancy pecan topping beats stale crumbs every time. Splurge a little on good butter or vanilla extract—trust me, it makes a huge difference in these easy treats!
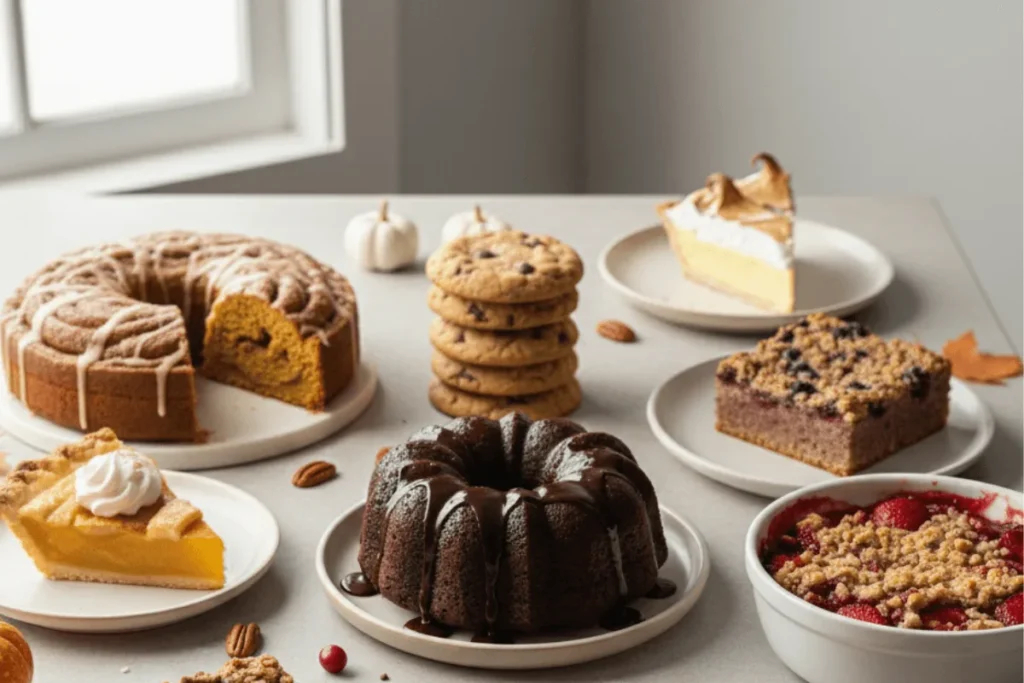
The 7 Best “Wait, I Made This?!” Fall Desserts
Here are seven desserts that ditch the boring and bring on the beginner-friendly fall vibes.
1. Pumpkin Cinnamon Roll Cake (Crazy-Easy Comfort)
Pumpkin + cinnamon + cake = instant cozy vibes. This one’s a seriously easy single-layer wonder, perfect for last-minute guests or just your own sweet tooth.
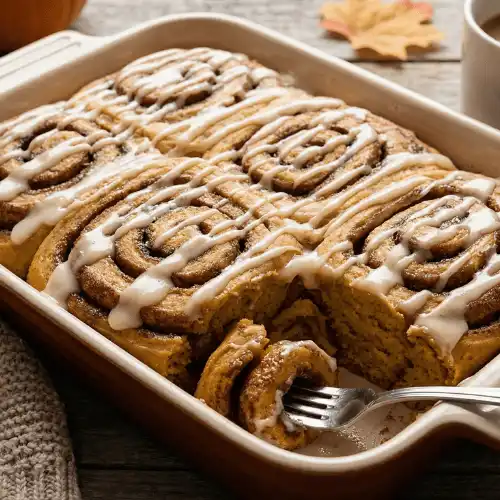
Pumpkin Cinnamon Roll Cake
Equipment
- A trusty 9×13 inch pan
- Your biggest mixing bowl
- An electric mixer or just a good whisk
- A little bowl for the swirl stuff
Ingredients
For the Cake Base
- 1 (15.25 oz) box Yellow or White Cake Mix Seriously, grab your fave brand!
- 1 cup Canned Pumpkin Purée Make sure it’s PURE pumpkin, not the pie filling!
- 3 large Eggs
- ½ cup Vegetable Oil
- 1 Tbsp Pumpkin Pie Spice For maximum "smells like fall" vibes!
For the Cinnamon Swirl Filling
- ½ cup Brown Sugar packed
- 1 Tbsp Cinnamon
- ¼ cup Unsalted Butter, melted
For the Simple Glaze
- 1 cup Powdered Sugar
- 2-3 Tbsp Milk or Half-and-Half Adjust until it's perfectly drippy!
- ½ tsp Vanilla Extract
Instructions
Preheat & Prep (The Chill Start)
- Get that oven fired up to 350 F (175°C).
- Grab your 9×13 inch pan and give it a good spray with non-stick stuff. Pro tip: lining it with parchment paper makes cleanup way easier!
Mix the Cake Batter
- Dump the cake mix, pumpkin purée, eggs, oil, and pumpkin pie spice into your big bowl.
- Whip it good with your electric mixer (or just use a whisk if you need an arm workout!) on medium for about 2 minutes until everything’s nice and smooth.
- Pour about 2/3 of that pumpkin goodness into your prepared pan.
Make the Cinnamon Swirl
- In the small bowl, stir together the brown sugar, cinnamon, and melted butter. Smells amazing already, right?
- Carefully plop spoonfuls of this cinnamon mixture all over the batter that's in the pan.
Finish and Bake
- Gently dollop the rest of the batter (that last 1/3) over the swirl layer. Don't worry about covering it perfectly—it’ll all melt together!
- Bake for 35 to 40 minutes. Stick a toothpick in the middle; if it comes out mostly clean, you’re golden!
- Let the cake chill out on a wire rack for about 15 minutes.
Glaze Time!
- Whisk together the powdered sugar, milk, and vanilla until it’s smooth, and you get that perfect "drip."
- Drizzle the glaze all over the warm cake. Slice it up and serve it warm (best way!) or room temp. Get ready for the compliments!
Notes
Nutrition (Just an Estimate)
| Component | Amount |
| Calories | 350 kcal |
| Total Fat | 15 g |
| Carbs | 50 g |
| Protein | 4 g |
2. Brown-Butter Chocolate Chip Cookies (A Total Upgrade)
Regular cookies are great, but browning the butter first? Game-changer. The butter gets all golden and nutty, making these cookies taste next-level amazing.
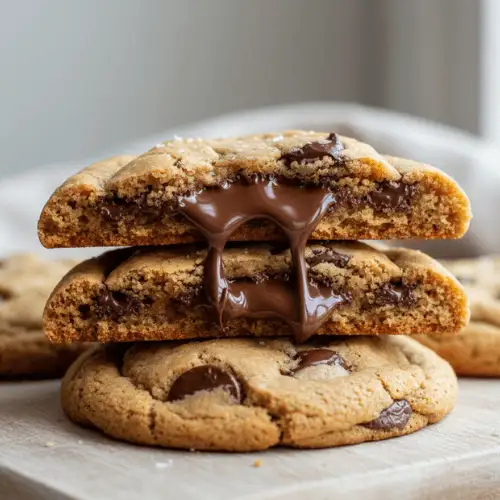
Brown-Butter Chocolate Chip Cookies
Equipment
- A medium saucepan
- A big mixing bowl
- Your baking sheets
- Parchment paper
- A cookie scoop
Ingredients
Brown Butter Base
- 1 cup Unsalted Butter (2 sticks) Go for good quality butter—it matters here!
Dry Ingredients
- 2¼ cups All-Purpose Flour
- 1 tsp Baking Soda
- 1 tsp Salt
Wet/Sugar Ingredients
- ¾ cup Granulated Sugar
- ¾ cup Brown Sugar (packed)
- 1 Tbsp Vanilla Extract Don't skimp—vanilla is important!
- 2 large Eggs
Mix-Ins
- 2 cups Chocolate Chips Try a mix of semi-sweet and milk chocolate for the best flavor party.
Instructions
The Brown Butter Magic (Game-Changer!)
- Chop up the butter and put it in your saucepan over medium heat.
- It'll melt, then foam, then you’ll see golden-brown specks forming on the bottom, and it’ll smell wonderfully nutty (think toffee!). Watch it closely!
- Immediately pour the hot brown butter into your large mixing bowl. Let it sit and cool for roughly 10 minutes.
Mix Wet Ingredients
- Stir the white and brown sugars into the slightly cooled brown butter.
- Add the vanilla and eggs, stirring until they're just mixed in.
Add Dry Ingredients
- Whisk the flour, baking soda, and salt together in a separate small bowl.
- Gradually add the dry stuff to the wet stuff, stirring only until it’s combined. Stop mixing once you can’t see the flour anymore!
- Fold in those beautiful chocolate chips.
Chill & Bake
- Crucial Step: Cover the dough and chill it in the fridge for at least 30 minutes. This makes a huge difference in texture!
- Preheat your oven to 375°F (190°C). Scoop balls onto the parchment-lined sheets.
- Bake for 10 to 12 minutes. The edges should be golden brown, but the centers should still look a little soft. They'll set up on the pan!
Notes
Nutrition (Just an Estimate)
| Component | Amount |
| Calories | 180 kcal |
| Total Fat | 10 g |
| Carbs | 21 g |
| Protein | 2 g |
3. Georgia Peach Pie with Boozy Whipped Cream (Fall Hug in Dessert Form)
Peaches might scream summer, but spice them up with some fall flavors, and add bourbon whipped cream? Boom! That warm, “grown-up” flavor totally wows.
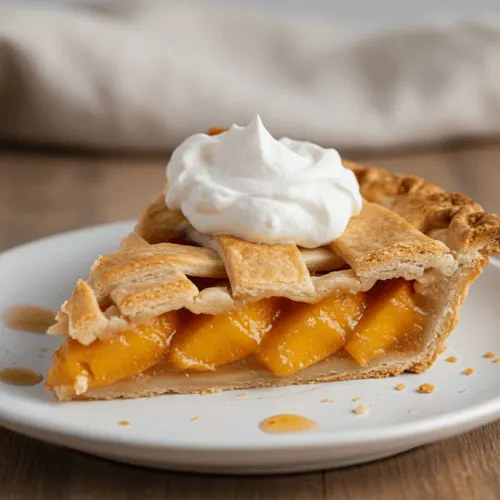
Georgia Peach Pie with Boozy Whipped Cream
Equipment
- A 9-inch pie dish
- A big bowl and a small bowl
- An electric mixer for that amazing whipped cream
Ingredients
For the Pie Filling
- 5 cups Frozen or Canned Sliced Peaches If using canned, drain them lightly and pat them dry so it's not too watery.
- ¾ cup Granulated Sugar Adjust based on how sweet your peaches are.
- ¼ cup All-Purpose Flour This is the crucial thickening agent!
- 1 tsp Lemon Juice Brightens the flavor up a bit.
- 1 tsp Cinnamon
- ½ tsp Nutmeg
For the Pie Crust
- 2 Refrigerated Pie Crusts 1 package
- 1 Egg (for washing) with 1 tbsp water
For the Boozy Whipped Cream
- 1 cup Heavy Whipping Cream Needs to be ice cold!
- 2 Tbsp Powdered Sugar
- ½ tsp Vanilla Extract
- 1 Tbsp Bourbon Whiskey That little "boozy" secret weapon!
Instructions
Prep the Pie
- Preheat your oven to a hot 425°F (220°C). Line your pie dish with one crust.
- In the big bowl, toss the peaches, sugar, flour, lemon juice, cinnamon, and nutmeg until all the fruit is coated.
- Pour that gorgeous fruit mixture into the crust.
Top & Bake
- Unroll the second crust and put it on top (or impress your friends and make a lattice!). Crimp those edges. Brush the top with the egg wash if you’re feeling fancy and sprinkle some sugar on.
- Bake for 15 minutes at 425°F. Then, lower the heat to 375°F (190°C) and bake for another 35-45 minutes.
- Let the pie cool for at least 2 hours. Seriously, don't cheat this part—the filling needs to set!
Make the Boozy Whipped Cream
- In the small bowl, use your electric mixer on high speed to beat the cold heavy cream.
- When soft peaks start to form, slowly add the powdered sugar, vanilla, and the bourbon.
- Keep beating until you get stiff peaks. Dollop this generously on your slice of pie!
Notes
Nutrition (Just an Estimate)
| Component | Amount |
| Calories | 420 kcal |
| Total Fat | 22 g |
| Carbs | 50 g |
| Protein | 5 g |
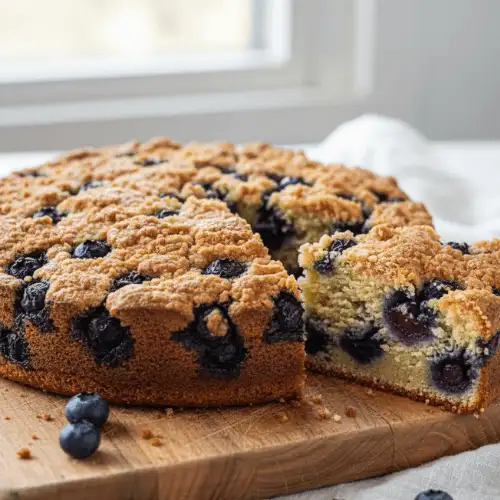
4. Mama’s Blueberry Buckle (The Coffee Cake Dream)
Forget cobbler—this blueberry buckle’s like a super moist coffee cake with a crumbly streusel topping. Great for breakfast, brunch, or dessert (or all three).
Mama’s Blueberry Buckle
Equipment
- An 8×8 inch square baking pan
- Medium and large mixing bowls
- A whisk
- Electric mixer makes the batter super fast!
Ingredients
For the Streusel Topping
- ½ cup All-Purpose Flour
- ¼ cup Granulated Sugar
- ½ tsp Cinnamon
- 4 Tbsp Cold Unsalted Butter Keep it cold!
For the Cake Batter
- 1½ cups All-Purpose Flour
- 2 tsp Baking Powder
- ½ tsp Salt
- ½ cup Unsalted Butter, softened Room temperature is key for creaming!
- ¾ cup Granulated Sugar
- 1 large Egg
- 1 tsp Vanilla Extract
- ½ cup Milk Whole milk works best for richness.
- 2 cups Fresh or Frozen Blueberries If they're frozen, don't thaw them!
Instructions
Make the Streusel (The Crumbly Goodness)
- Preheat your oven to 375°F (190°C).
- In a medium bowl, mix the flour, sugar, and cinnamon for the topping.
- Blend the cold butter cubes into the mixture until it takes on a coarse crumb texture. You can achieve this with a pastry cutter or simply with your fingers. Set it aside.
Mix the Cake Batter
- Employ your mixer to thoroughly cream the softened butter with the sugar. Then beat in the egg and vanilla.
- Add the dry mixture (flour, baking powder, salt) and the milk alternately to the wet mixture, mixing only until it's just combined.
- Gently fold those blueberries into the cake batter. Be gentle so they don't burst!
Assembly & Bake
- Spread the batter out evenly in your prepared 8×8-inch pan.
- Sprinkle all that gorgeous streusel topping evenly over the batter.
- Cook for 40 to 45 minutes, checking with a toothpick to ensure it comes out clean.
- Let it cool in the pan for about 10 minutes before slicing.
Notes
Nutrition (Just an Estimate)
| Component | Amount |
| Calories | 380 kcal |
| Total Fat | 18 g |
| Carbs | 50$g |
| Protein | 5 g |
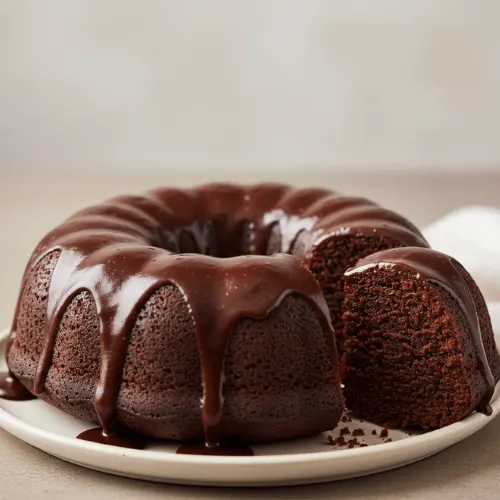
5. Double Chocolate Bundt Cake with Sleek Glaze
Bundt cakes can be heavy, but this one’s surprisingly light, super moist, and looks fancy enough to fool your friends.
Double Chocolate Bundt Cake
Equipment
- A 10-12 cup Bundt pan the fancy donut-shaped one!
- Electric mixer handheld or stand
- A couple of big mixing bowls
- A whisk
Ingredients
For the Cake
- 2½ cups All-Purpose Flour
- ¾ cup Unsweetened Cocoa Powder Use high-quality stuff for the best, deepest chocolate flavor!
- 1 tsp Baking Soda
- ½ tsp Salt
- ½ cup Unsalted Butter, softened
- 1¾ cups Granulated Sugar
- 3 large Eggs
- 1 tsp Vanilla Extract
- 1 cup Sour Cream or Plain Yogurt The secret to extreme moistness!
- 1 cup Water or Coffee, hot This helps the cocoa powder really "bloom." Coffee adds a deeper flavor!
For the Simple Glaze
- 1 cup Powdered Sugar (Icing Sugar)
- 2-3 Tbsp Milk or Water Adjust until you get the perfect drizzly consistency.
- ¼ tsp Vanilla Extract
Instructions
Prep the Pan & Dry Ingredients
- Preheat your oven to 350°F (175°C). Crucial Bundt Step: Grease your pan super well and dust it lightly with flour so it doesn't stick!
- In one big bowl, whisk together the flour, cocoa powder, baking soda, and salt.
Mix Wet Ingredients
- Cream the softened butter and sugar. Then beat in the eggs, vanilla, and the sour cream (or yogurt).
- Add the dry mixture to the wet mixture little by little.
- Carefully pour the hot water (or coffee) into the batter and mix briefly until it’s smooth.
Finish and Bake
- Pour the batter into the prepared Bundt pan.
- Bake for 50 to 60 minutes, or until a wooden skewer poked in comes out clean.
- After letting the cake sit in the pan for 15 minutes to cool, carefully invert it onto a wire rack. Let it cool completely before glazing.
Glaze It Up
- Whisk together the powdered sugar, milk, and vanilla until you have a smooth, thin glaze.
- Drizzle that gorgeous glaze all over the completely cooled cake. Done!
Notes
Nutrition (Just an Estimate)
| Component | Amount |
| Calories | 310 kcal |
| Total Fat | 12 g |
| Carbs | 48 g |
| Protein | 5 g |
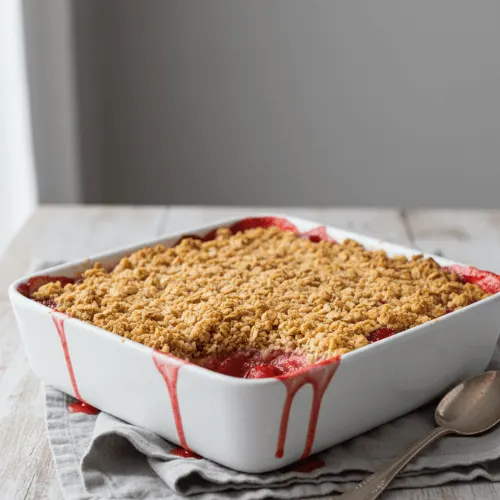
6. Old-School Strawberry-Rhubarb Crisp
This is like a warm hug in dessert form. Tangy fruit, buttery oat topping, super easy—it basically makes itself.
Strawberry-Rhubarb Crisp
Equipment
- An 8-8 inch square baking dish or an equivalent round one
- Two medium bowls
- A pastry cutter or just use a fork or your hands!
Ingredients
For the Fruit Filling
- 2 cups Fresh or Frozen Rhubarb, chopped
- 2 cups Fresh or Frozen Strawberries, sliced Chop into 1/2 inch pieces.
- ¾ cup Granulated Sugar
- 2 Tbsp Cornstarch Adjust based on how tart your rhubarb is.
- 1 tsp Lemon Juice This is what keeps the filling from being runny!
For the Buttery Oat Topping
- 1 cup Old-Fashioned Rolled Oats Make sure it's not instant oats!
- ½ cup All-Purpose Flour
- ½ cup Brown Sugar (packed)
- ½ tsp Cinnamon
- 6 Tbsp Unsalted Butter, cold Keep it cold for the best crumble!
Instructions
Prep the Fruit
- Preheat your oven to 375°F (190°C).
- In a medium bowl, gently toss the chopped rhubarb and strawberries with the sugar, cornstarch, and lemon juice.
- Pour that fruit mixture into your 8-8-inch baking dish.
Make the Crumbly Topping
- In a separate medium bowl, combine the oats, flour, brown sugar, and cinnamon.
- Cut in the cold butter cubes until the mixture is coarse and crumbly. You want pea-sized clumps.
Bake!
- Evenly scatter that gorgeous oat topping over the fruit filling.
- Bake for 40 minutes, or until the topping is golden brown and the fruit filling is happily bubbling away.
- Let the crisp rest for 10 minutes before you dig in.
Notes
Nutrition (Just an Estimate)
| Component | Amount |
| Calories | 310 kcal |
| Total Fat | 14 g |
| Carbs | 48 g |
| Protein | 4 g |
7. Zesty Lemon Meringue Pie with a Shortcut Crust
Need a break from all the heavy spices? This bright, sunny pie is your answer. Plus, it’s lightning-fast to make.
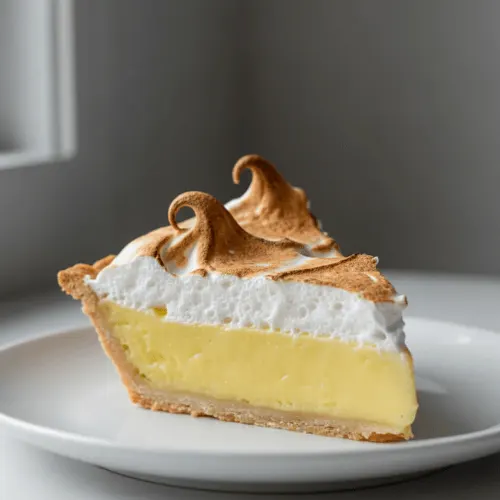
Zesty Lemon Meringue Pie
Equipment
- A 9-inch pie dish
- A small saucepan
- A whisk your arm will get a workout!
- Electric mixer handheld or stand, essential for the fluffy meringue
Ingredients
For the Shortcut Crust
- 1 Store-bought Shortbread Crust (9-inch) The biggest time saver!
For the Lemon Filling
- 1½ cups Granulated Sugar
- ¼ cup Cornstarch The main thickener.
- 1½ cups Water, cold
- 4 large Egg Yolks Save those whites for the meringue!
- ½ cup Lemon Juice, fresh squeezed It absolutely must be fresh-squeezed!
- 1 Tbsp Lemon Zest For maximum zing and lemon smell!
- 2 Tbsp Butter Adds a nice richness.
- 4 large Egg Whites Room temperature is definitely the best here.
- ½ cup Granulated Sugar
- ½ tsp Cream of Tartar This helps stabilize the meringue so it stands tall!
Instructions
Make the Filling
- Whisk the sugar and cornstarch in a saucepan until well mixed. Then slowly whisk in the cold water.
- On medium heat, bring the mixture to a boil while stirring without stopping. Boil for 1 minute. Then take it off the heat.
- Whisk the egg yolks. You need to "temper" them: slowly add some hot mixture to the yolks while whisking like crazy. Pour this mixture back into the saucepan. Cook over low heat for 1-2 minutes (seriously, do not boil!).
- Remove from the heat and incorporate the lemon juice, zest, and butter.
- Pour the hot filling right into the shortcut crust.
Make the Meringue
- Preheat your oven to 350°F (175°C).
- Using your electric mixer, beat the egg whites and cream of tartar until they’re foamy.
- Slowly beat in the granulated sugar until the meringue is glossy, and when you lift the beaters, stiff peaks form.
Meringue & Finish
- Immediately pile the meringue on top of the hot lemon filling. Make sure the meringue touches the edge of the crust all the way around—this seals it! Make some fun peaks.
- Bake for 8 to 10 minutes until those peaks are a beautiful light golden brown.
- Let the pie cool at room temperature for an hour, and then you must chill it in the fridge for at least 2 hours before you slice it.
Notes
Nutrition (Just an Estimate)
| Component | Amount |
| Calories | 350 kcal |
| Total Fat | 14 g |
| Carbs | 55 g |
| Protein | 6 g |
Wrapping It Up
See? No need to choose between being lazy and impressing people! These easy fall desserts prove you can have both. With simple steps and good ingredients, you’ll be dishing out incredible autumn treats without the usual baking freak-out. Seriously, it’s all about having fun and getting great results.
FAQs
Got any low-sugar or dietary alternatives?
While these recipes aren’t tested with sugar swaps (some desserts like pumpkin pie can get iffy), you can find lots of vegan or gluten-free fall recipes made from scratch online.
Can I make these ahead of time?
Totally! Fruit fillings and custards often taste better after sitting overnight. Baked pies last covered in the fridge for up to five days. Cakes? Keep them snug at room temperature for up to three days.
Is Carrot Cake a fall dessert?
Absolutely! It’s packed with cozy spices like cinnamon and nutmeg and feels totally autumnal with nuts and a hearty texture.
What fruits scream fall?
Apples, pears, cranberries, grapes, figs, and pomegranates all rule fall desserts. Plus, pumpkins and squash make tons of sweet dishes.
What are the nine classic desserts?
Think cake, pie, cookies, pastries, ice cream, pudding, cheesecake, brownies, and crisps/crumbles. These usually show up everywhere and never go out of style.
There you have it—easy, fun fall desserts that’ll get you all the compliments and zero stress!