
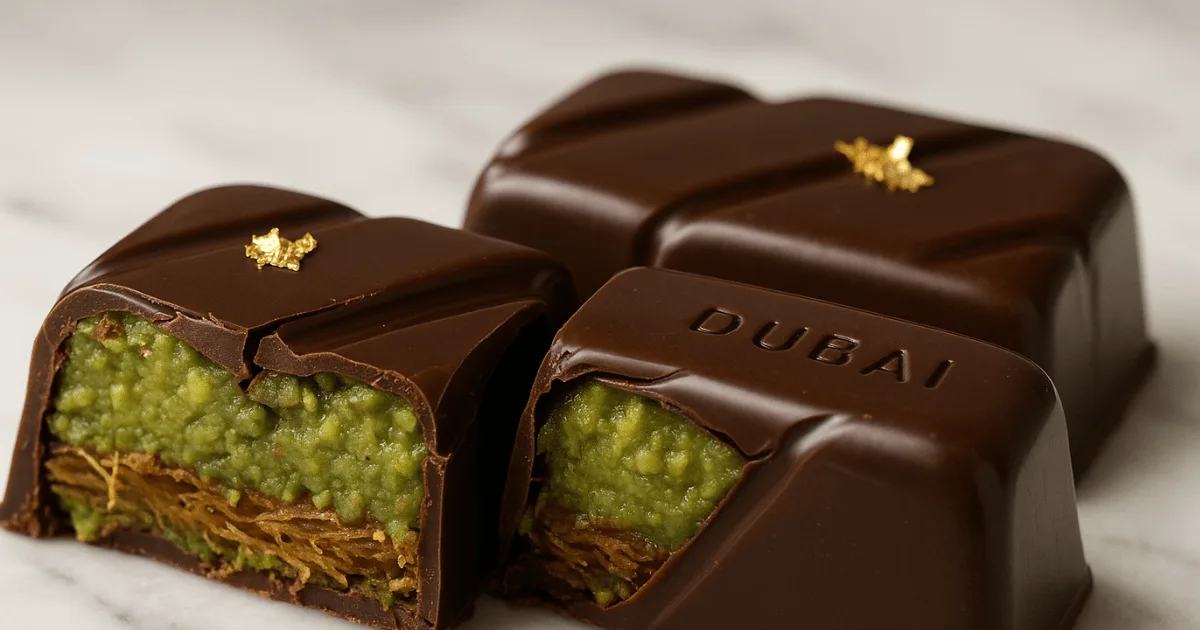
If you’ve been scrolling through TikTok or Instagram lately, chances are you’ve come across that viral Dubai Chocolate Recipe. You know the one—with that glossy chocolate shell, smooth pistachio filling, and that crazy satisfying crunch when you take a bite? It’s chocolate ASMR, and I’m not gonna lie… It’s got all of us (yes, me too) obsessed.
But here’s the best part: this Dubai Chocolate Recipe isn’t just for fancy dessert shops in Dubai anymore. You can make it at home — and no, you don’t need to be a professional chocolatier or own a food styling studio. Whether you’re a kitchen newbie or a weekend baking enthusiast, I promise this is doable.
So, if you’ve been dying to try that viral Dubai Chocolate Recipe, keep reading. I’ll break it all down — no stress, no fluff, just dessert magic.
Table of Contents
So, What’s the Big Deal with the Dubai Chocolate Recipe?
First off, let’s talk about why this chocolate bar is such a big deal. The Dubai Chocolate Recipe first popped up in fancy dessert shops around Dubai—spots like The FIX Dessert Chocolatier were some of the first to mix Middle Eastern flavors with high-end chocolate-making tricks.
And then… TikTok got hold of it.
Maria Vehera, a food blogger, posted her version of the Dubai Chocolate Recipe, and boom — it hit over 80 million views. Suddenly, everyone wanted to recreate that gorgeous bar with the crispy filling and luxurious pistachio core.
Why the Dubai Chocolate Recipe is Chocolate Royalty
- It’s Crunchy, Creamy, and Dreamy: Creamy chocolate, crunchy kataifi pastry, and a decadent pistachio-tahini filling — it’s all about the texture!
- It’s Middle Eastern Meets Modern: You’ve got traditional ingredients like tahini and pistachios working their magic in a new way.
- It’s Just Plain Gorgeous: This Dubai Chocolate Recipe isn’t just delicious — it looks like edible art. Edible gold, swirls, glossy finishes… chef’s kiss.
- It’s Doable: Despite how fancy it looks, this is a super beginner-friendly recipe once you know the steps.
Let’s Jump to the Exciting Part — Creating Your Own at Home
Ready to play chocolatier for the day? Here’s how to make two big, beautiful Dubai-style chocolate bars that’ll make your friends think you trained in Paris and vacationed in Dubai for inspiration.
Ingredients You’ll Need
Crunchy Filling:
- Kataifi pastry – 5 to 8 oz (find it in the freezer aisle; it looks like shredded angel hair pasta)
- Unsalted butter – 2 to 4 tablespoons (don’t skimp — buttery crunch is the goal)
- Pistachio butter or cream – 1 to 1.5 cups (the main flavor ingredient)
- Tahini – 1 to 3 tablespoons (adds nutty depth and makes you feel fancy)
- Honey – 1 tablespoon (optional, but adds sweetness)
- Salt – just a pinch (makes everything pop)
- Sugar – about ⅓ cup (optional, but gives that golden caramelized finish)
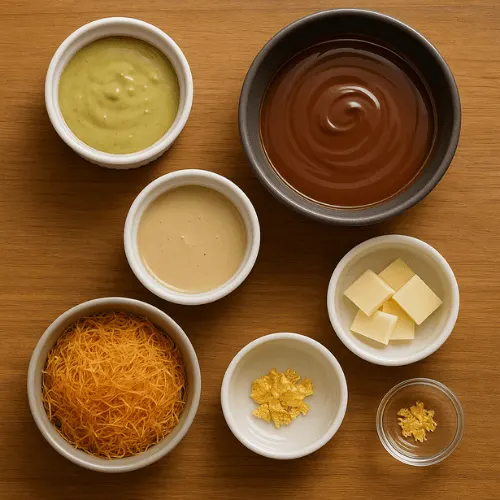
Chocolate Shell:
- Good-quality milk chocolate – 500g (about 1 lb — don’t use the cheap stuff)
- White chocolate – a few tablespoons for decoration
- Coconut oil – Use a teaspoon to aid in faster melting.
- Edible gold dust or sprinkles – if you’re feeling bougie (and why not?)
Let’s Make This Happen (Step-by-Step)
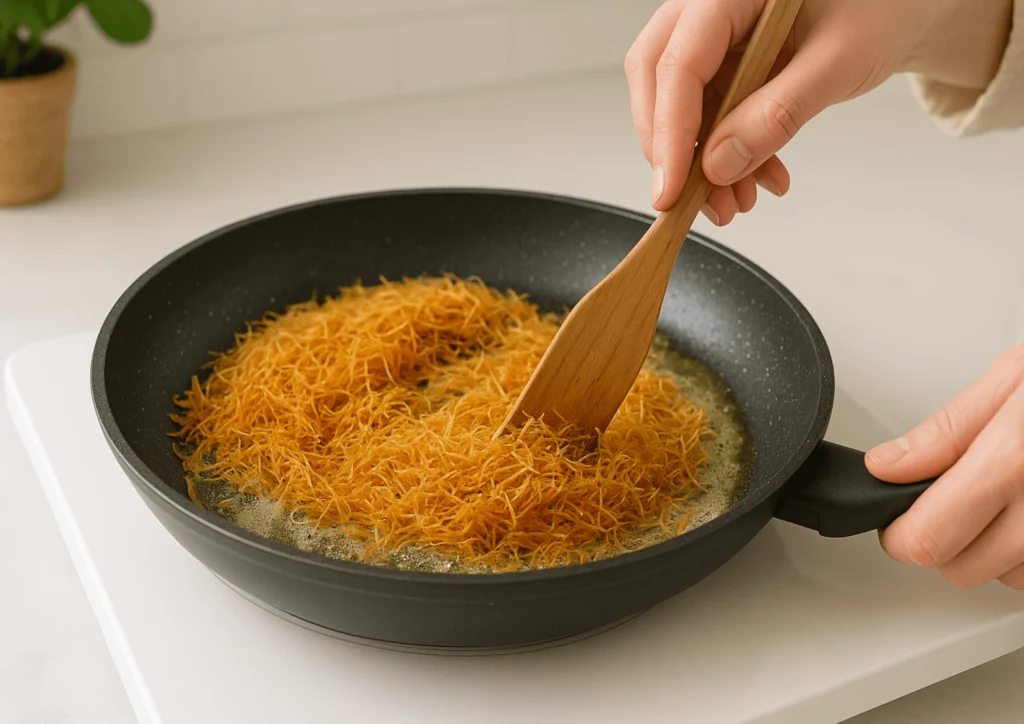
1. Toast the Kataifi Like a Pro
Thaw frozen kataifi first—no shortcuts! Melt butter in a skillet, then add the kataifi, breaking it up as you go. It’ll look messy, but don’t worry—just keep stirring. Stay close! It turns golden fast, and burnt kataifi is a tragedy. If using sugar, sprinkle it in and stir until caramelized and crispy.
Once golden, spread it on a tray to cool completely—warm kataifi + creamy stuff = a sad, melty disaster. Trust me, wait for the crunch!
2. Make That Lush Filling
While the kataifi is cooling, get a bowl and combine your pistachio cream, tahini, a pinch of salt, and honey (if you choose to use it). Mix until it’s silky smooth. The tahini gives it a nutty complexity that makes people say, “Wait… what is that?! It’s amazing.”
Once the kataifi is cool, gently fold it in. Try not to crush it — you want those crispy bits to stay intact so you get that epic crunch in every bite.
Time to Create the Chocolate Shells
1. Prep the Molds
Wipe your chocolate bar molds completely dry. The texture of your chocolate can be affected by even the smallest amount of water. Place the molds on a tray that fits in your fridge.
2. Get Fancy (Optional)
Melt a little white chocolate (in short microwave bursts, 10–15 seconds at a time). Add some food coloring if you’re feeling creative. Flick or drizzle it into the molds, Jackson Pollock style. Freeze for 10 minutes to set.
3. Melt the Main Chocolate (Patience is Key)
Warm your milk chocolate in the microwave for 30-second intervals, making sure to mix it after each one. Don’t rush this part — overheated chocolate gets thick and loses its shine. Add a bit of coconut oil if it looks too thick or stubborn.
4. Make the Shells
Distribute around 25% of the melted chocolate into each mold. Tilt and swirl to coat all sides. Tap the mold gently to release air bubbles. Then flip the mold upside down to let the extra chocolate drip out. Scrape the top edges for a clean finish.
Place the shells in the fridge for around 20 minutes, until they are firm.
Time to Make Chocolate Shells!
Build the Shells – Add a small amount of chocolate, swirl it around to cover, tap to remove bubbles, and then invert to let the excess drain. Scrape the edges clean—neatness counts! Chill 20 mins until rock-solid.
Prep the Molds – Dry them thoroughly, because even a small amount of water can ruin the chocolate’s character. Set them on a fridge-friendly tray.
Get Artsy (Optional) – Melt white chocolate (10-15 sec bursts!), tint if you want, then splatter it like an edible masterpiece. Freeze for 10 minutes to lock in the art.
Melt the Chocolate Right – Microwave milk chocolate in 30-second bursts, stirring between. Impatient = dull, gloppy chocolate. Too thick? Even a small amount of coconut oil can have a significant impact.
Pro Tips: Learn from My Mistakes
- Don’t rush the chocolate: The key is in using slow microwave intervals. Burnt chocolate is heartbreak in a bowl.
- Cool the kataifi completely: Hot filling will ruin the shells.
- Use a warm knife to slice: Run your knife under hot water, dry it off, and cut for clean, pro-looking slices.
- Store in the fridge: These bars taste best chilled — the crunch factor is off the charts.
What If Something Goes Wrong?
- Is the chocolate too thick? You may have overheated it or let water in. A tiny bit of neutral oil might save it.
- Shells melting? Your filling was too warm. Make sure everything is cool before assembly.
- Filling too loose? Add a bit more kataifi for texture or chill it longer.
Remix It Your Way
This is where it gets fun. You can switch things up based on your taste or what’s in your pantry.
Try these:
- Dark chocolate shell: Rich and slightly bitter — perfect if you want less sweetness.
- White chocolate swirl: Visually stunning and Instagram-worthy.
- Almond or hazelnut butter: Works if pistachio isn’t your thing (but seriously, give it a chance!).
- Spices: A dash of cardamom or rose water gives you true Dubai dessert market vibes.
Dubai Chocolate Bar Spin-Offs
Once you master the classic, try these fun ideas:
- Dubai Chocolate Cups: Layer filling and melted chocolate in clear dessert cups. Top with berries or gold flakes.
- Chocolate Cheesecake Base: Use the kataifi-pistachio filling as a crust below creamy cheesecake.
- Crunchy Mousse: Mix the filling into chocolate mousse for a fancy, textural dessert.
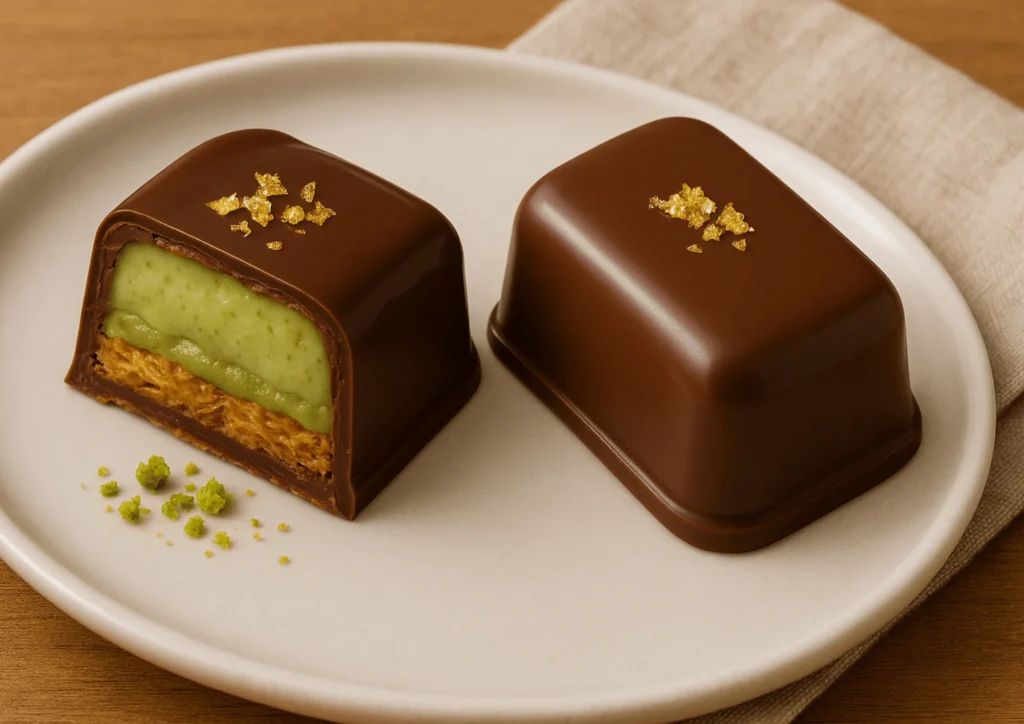
How to Serve + Store Like a Dessert Queen
- How to Serve + Store Like a Dessert Queen
- Serve it cold, baby – Trust me, that chill brings out the perfect combo of silky chocolate and crunchy filling. It’s like a mini party in every bite.
- Let it sit for 5–10 minutes before slicing – This little pause makes cutting way easier and keeps those edges looking sharp and photo-ready. No chocolate cracks here!
- Storage magic – Store your bars in an airtight container and refrigerate them for as long as a week. Want to make them last longer? Freeze ’em! Just let them thaw overnight in the fridge like the royalty they are.
Dubai Chocolate Recipe FAQs
Is tahini necessary?
YES. It adds nutty depth and makes the flavor far more interesting. But almond butter works in a pinch.
Do I need a mold?
Molds help, but you can also use silicone muffin cups or even a small loaf pan lined with parchment.
Can I make it ahead?
Totally! The Dubai Chocolate Recipe holds up well for days in the fridge.
What’s kataifi again?
It’s shredded phyllo dough, kind of like angel hair pasta for desserts. It’s super crunchy when toasted.
Final Thoughts
There are tons of trendy desserts out there, but this Dubai Chocolate Recipe? It deserves the hype. It’s rich, crunchy, creamy, and just straight-up delicious. Plus, it looks super fancy — like something you’d buy in a boutique chocolate shop — but tastes even better ‘cause you made it.
And hey, making it isn’t just about wowing your friends (though they’re gonna be impressed). It’s about playing with bold flavors, having some fun in the kitchen, and treating yourself to something seriously next-level. Once you nail this Dubai Chocolate Recipe, regular chocolate bars just won’t hit the same.
So go on, grab your ingredients, set aside a little time, and create some dessert magic. That first crunch? Pure joy.